BIT-101
Bill Gates touched my MacBook Pro

Posts in this series:
Obviously I’m pretty new to Hugo, so it may seem presumptuous to start writing a tutorial about it. But the best way to learn is to teach, so this is mostly for me. But if someone else benefits from this, all the better!
I’m going to assume that you’ve got Hugo installed, or can figure out how to get it installed. That might be as far as you got, and you’re wondering where to go from there.
Or maybe you’ve installed a pre-built theme and got that working, but now you want a bit more control.
Or maybe you’ve tried to create your own theme and got confused, like I did.
This post is mainly about making a custom theme, so I’m not going to go too deep into Hugo functions and variables and syntax. Of course I’ll have to use that stuff at points, but I’m going to assume that either you are familiar with it already, or that you’ll be able to look it up and figure it out.
I also want to mention that there is a command (hugo new theme mytheme) that will create all the necessary theme folders and some of the files for you. I don’t use that here, instead choosing to build things up piece by piece for a fuller understanding of what each piece does.
Go to the directory you want to create your site and type:
hugo new site mysite
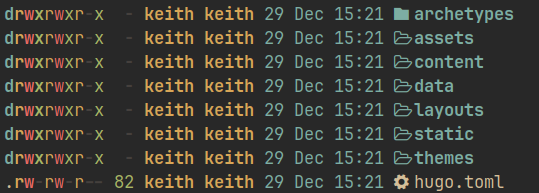
Hugo will create a new directory in that folder and within that will create a bunch of other folders and files. cd into that folder and take a look around. You should see something like this:
Now make a new post or page:
hugo new posts/first.md
The posts part can be anything. If you’re building a blog and want to have posts, then posts makes sense. If you’re building another kind of site that has more of a page paradigm, then use pages/first.md. Again, it can be anything and it has no meaning other than the fact that it’s going to define your navigation and URL paths.
Now let’s edit your post. It should be in content/posts/first.md and will look like this:
---
title: "first"
date: 2023-12-29T11:43:54-05:00
draft: true
---
All that stuff is called “front matter”. It’s the metadata of the post or page. Feel free to edit the title and even the date. Keep draft as true for now. And add some content below the final ---. This is a markdown file, so if you’re familiar with markdown, you should be all set. Save it when you’re done.
Now you probably want to see your awesome site. So back in the command line, in the root of your new project type:
hugo server -DF --noHTTPCache
The first part runs the server which will serve up your new site locally in development mode. The -D will publish posts that are still in draft mode, and the F will publish posts that have dates in the future. You probably want to use these two options when you’re testing your site in dev mode. But when you’re deploying your live site, you’ll usually omit those.
The dev server you are now running is live updating, so your site will refresh whenever you save anything in the project. The --noHTTPCache parameter just helps to make sure that all changes are picked up and nothing is cached.
You probably want to run the server in a separate terminal or tab from where you’re doing your development so it stays running, but available so you can stop and restart it easily as needed.
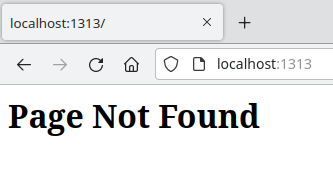
In a browser, go to localhost:1313. Voila! … um… “Page Not Found”. The server is running, but it’s not finding the content. If you’re familiar with Hugo or web servers in general, you might try going to localhost:1313/posts or localhost:1313/posts/first. Same deal.
You may also have noticed some warnings when you started the server, saying it couldn’t find layout files and telling you you should make some templates. Well, that’s what we’re here for!
There are a few basic templates that Hugo supports out of the box. The home page, a list page, and a single page. Let’s start with the home page.
In your project, you’ll see a themes folder. In that, create a folder for your theme. I’m going to name it mytheme but feel free to be more creative.
Inside that, create a layouts folder, and within that create an index.html file. For now just put some text in there, like this is the home page.
You might be tempted to fill this page up with some kind of standard HTML markup. Hold that thought. Keep it simple for now.
OK. We have the barest, most minimal, bare-minimal theme ever. Let’s tell Hugo to use this theme. Edit hugo.toml in the root of your project. And add a line to point to your theme. It should look like this:
baseURL = 'http://example.org/'
languageCode = 'en-us'
title = 'My New Hugo Site'
theme = 'mytheme'
Make sure everything is saved. Although the server mostly live-reloads, it often doesn’t when you make major file changes. So you might need to refresh your browser, or even stop and restart the server. You should wind up with your new home page successfully displaying, “this is the home page.” (or whatever you filled it with).
We’ll flesh this out later, but let’s build out the files for single pages and lists first.
While your home page “works” now, if you go to localhost:1313/posts or localhost:1313/posts/first, you’re still going to get “Page Not Found”. That’s because those paths are looking for a list template and a single page template. So let’s make them.
In your template’s layout folder, create a folder called _default. In that, create list.html and single.html files. Again, keep the content simple, something like, “this is a list page” and “this is a single page”.
You might need to restart the server, but now you should be able to go to localhost:1313/posts and see your list page, and go to localhost:1313/posts/first to see your single page.
We’re getting somewhere!
A few more things to note here:
localhost:1313/tags and localhost:1313/categories even though you didn’t define any tags or categories. Those are built in.localhost:1313/pages or a specific page that doesn’t exist like localhost:1313/posts/second, you’ll get “Page Not Found” as you should expect.So far, our HTML pages just consist of bits of raw text. You’re probably itching to create DOCTYPEs and meta tags and html, head, and body tags, etc. And we could do that in each of our three templates if we wanted. But we’d probably be duplicating a lot of stuff, and would need to change that in all three places every time we wanted to update it.
There are a couple of obvious strategies to handle this.
One is to extract the repeating sections and include those pieces in each of the three templates.
The other way is to create a base template and include each of the three page templates in the base. Hugo does the latter. The base template is called baseof.html and lives in the layouts/_default folder of your theme. Create that now.
Now we can fill in all the HTML goodness in this file. Something like this:
<!DOCTYPE html>
<html>
  <head>
      <meta charset="utf-8">
      <meta name="viewport"
          content="width=device-width, initial-scale=1.0">
      <title>My site</title>
  </head>
  <body>
    <p>this is the base template</p>
  </body>
</html>
Feel free to add whatever meta tags, style and script links, etc. here, but try to keep the content generic. Remember, this template will be used as the base of every page in your site. Later we’ll put a header and footer in here, which makes sense.
And now we need to insert the content of our other three templates into this base template. To do that, we reference a block. Now we get into our first taste of Hugo syntax. Our block looks like this:
<!DOCTYPE html>
<html>
  <head>
      <meta charset="utf-8">
      <meta name="viewport"
          content="width=device-width, initial-scale=1.0">
      <title>My site</title>
  </head>
  <body>
    <p>this is the base template</p>
    {{ block "main" . }}
    {{ end }}
  </body>
</html>
We reference a block called main within double curly brackets, and pass in the dot . to it, which in Hugo terms is like passing “this”. Note that we also need to end this block with the end tag.
Now we need to define this main block in each our our templates. In each of index.html, single.html and list.html, surround the text with a block definition tag, like so:
{{ define "main" }}
this is a single page.
{{ end }}
Now, Hugo will always use baseof.html. When you’re on the home page, it will insert the main block from index.html into the base. When you’re on a list or single page, it will include the main block from one of those.
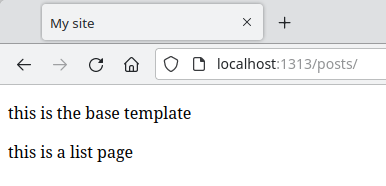
Again, with all these major changes, you’ll probably have to restart the server and refresh your browser, but now when you navigate to localhost:1313 or the paths /posts or /posts/first, you should see the line, “this is the base template” and the text from the individual template shown in the browser.
Note that non-existent paths will still correctly serve “Page Not Found”.
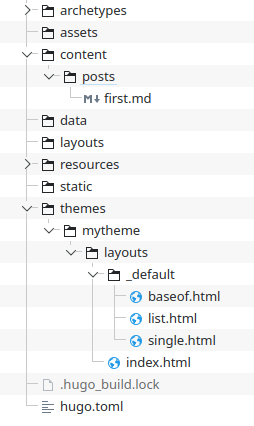
In case you’re having any issues, here’s what your project should look like at this point:
OK, that’s enough for one post. It might be a bit unsatisfying since we didn’t actually theme anything or even show our single post yet. We’ll get there. But perhaps the most important thing about understanding Hugo theming is knowing all of the components of a theme, what each one does, where they live, and how they work together. We’ve covered most of that here today. Next time we’ll start displaying actual content, and then work on a bit of styling.
Header Image 'Binary code' by Christiaan Colen is licensed under CC BY-SA 2.0