BIT-101
Bill Gates touched my MacBook Pro
Over the years I’ve made many abortive attempts to keep some sort of journal. For no other reason than I think it’s good to reflect on your life on a regular basis in some kind of organized way. I love writing and find that by describing something in written words often helps me to clarify things. I’ve always maintained that teaching is the best way to learn something deeply. So maybe by writing things that are going on in my life, I’ll learn something. Better than disorganized worrying about them anyway.
Inspired by this post on mastodon, I decided to give it another shot.
Choices:
So we come down to the two universal tools - the only two things anyone needs ever. vim and git.
Disclaimer: I actually use neovim, but generally don’t make the distinction. It will be important here because I use neovim’s lua syntax for some of the stuff below.
I found a few articles that had a lot of valuable tips. Here are some good ones:
What’s great about using vim for stuff like this is that you have all kinds of configurations, tools, plugins, autocommands, etc. to make it do what you want it to do and look how you want it to look. The articles listed above have some great ideas on templates (vim skeletons) and autocommands and autocompletion sources. I’ve used a few of these and will add more as time goes on.
While I was looking around for tips, I heard mention of vimwiki. I knew of this project but I didn’t know that it had a built-in diary mode. This sets up a section of your vimwiki to be a journal, exactly what I wanted. I already have another solution for my personal wiki knowledge base, so I don’t use the wiki part of vimwiki, but the diary part looked great.
Essentially, there are a handful of vim mappings (keyboard shortcuts) it sets up. For example, one takes you to your diary post for today (creating that file if it does not exist). If I have a thought, I just hit that shortcut, I’m in my journal entry for today, I write what I want, save and exit.
There are other shortcuts for yesterday’s entry and tomorrow’s, as well as the diary index file. And another shortcut when you are in the index to create a nicely formatted list of links to all your entries. Also, while you’re in any diary entry, you can tab to each link and hit enter to go to that page. And backspace to go back to the previous page. All very nice added functionality.
Off to a great start, but now when I go to today’s entry, if I haven’t already written anything, I get a blank document. I had a template in mind - things that I want to comment on each day. Prompts, you could say. I came up with something like this:
== Personal ==
*

== Reading ==
*

== Watching ==
*

== Health ==
*

== Work ==
*
One thing I discovered is that vimwiki uses wiki markdown flavor. I’m used to #, ##, ### for headers and - for unordered lists. But wiki flavor favors =, ==, === and *. I think it will work fine with the other format, but when I viewed my files in github, they were all messed up. I guess github was seeing the .wiki extensions and trying to render them with that flavor, and it was not good. So I use what I’m supposed to.
Now, to use this template every time I make a new entry. In vim, you have various “autocommands” that run on a file in various situations, like when it is created, opened, closed, before and after writing, saving, etc. We can tap into these to apply the template. Here’s the start.
vim.api.nvim_create_autocmd("BufNewFile", {
  pattern = { "*/vimwiki/diary/**" },
  callback = journalCreate,
})
This is a bit different than default vimscript, because neovim uses a lua syntax for it’s config. Actually, it can use either, but I moved over to lua a while ago.
So I’m creating an autocommand that will run when a new file is created. It’s limited to files created in */vimwiki/diary/ which is where vimwiki puts its diary files. When a new file is created in vim in that location it runs the journalCreate function, which I also created.
function journalCreate()
  date = vim.fn.expand('%:t:r')
  vim.api.nvim_command("0r ~/.config/nvim/templates/diary.template")
  vim.api.nvim_buf_set_text(0, 0, 0, 0, 0, {"= " .. date .. " ="})
end
First, vimwiki creates the file with a name like 2024-12-28.wiki. I get and expand the file name with % and limit it to the tail of the full path - :t and strip off the extension - :r. This gives me a date variable like 2024-12-28.
Next, I run a vim command of 0r with the path to the template I just showed above. To be honest, I have no idea what 0r means, but I know what it does. It loads that template and yeets it into the buffer that was just created.
Finally, I set the text in buffer 0 (current buffer), line 0, row 0 to line 0, row 0, to the date, surrounted with = chars.
Now, when I go to a yet-uncreated entry, I get something like this:
= 2024-12-28 =

== Personal ==
*

== Reading ==
*

== Watching ==
*

== Health ==
*

== Work ==
*
Note that I added a couple of blank lines to the top of my template to make room for the header insertion.
That whole file parsing, date header thing is more than just cosmetic though, as we’ll see in a minute.
As I said, one of the main vimwiki diary shortcuts takes you to the diary index page. By default this is empty. I want it to be an actual index with links to all my entries. This might be a case for another template, but we don’t even need that because vimwiki already has a function for generating such an index. It’s set up with another shortcut, but I don’t want to have to hit that shortcut or wonder whether or not the index is up to date when I open it. I just want it to be up to date as soon as I open it.
Time for another autocommand!
vim.api.nvim_create_autocmd("BufReadPost", {
  pattern = { "*/vimwiki/diary/diary.wiki" },
  command = "VimwikiDiaryGenerateLinks"
})
This one activates when I read a new file, but only matches my diary index file. When this happens it calls a vimwiki-defined function, VimwikiDiaryGenerateLinks. So the first thing that happens after I open this file is that it gets updated. Perfect.
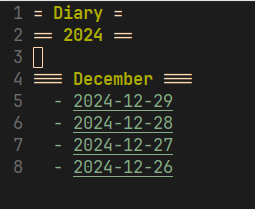
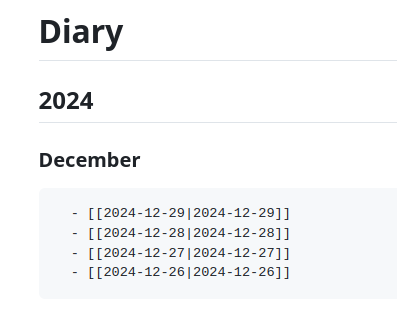
By the way, here’s what it looks like:

Note that each entry has the name given in the header of the corresponding file. If I did not generate that header, each list item would just say “Personal” as that’s the first header on the page - unless I manually added another header. Hence the automation.
In github, this is at least human readable. Sadly, the wiki-type links do not become linkable there. Maybe there’s some github config for that? Not a big deal though.

Two things remaining.
One, I don’t want to have to run vim and then hit a shortcut to get to my diary. I wanted to have a command that would just open vim to the diary index.
Simple enough with an alias.
alias diary="vim ~/vimwiki/diary/diary.wiki"
Finally, I wanted to be able to back up my diary, not just have it be subjected to accidental deletion or eventual hard drive failure. Since it’s all just text, github makes sense. I made a repo and got it all tracking my vimwiki. But I didn’t want to have to manually do git add ., git commit -m <message>, git push every time. Because I know I’ll forget and get lazy.
My first thought was a cron job, set to push every hour or whatever. This all worked fine except for the push. The key I use for git has a passphrase and there’s no good way I found to get the cron job to use that. Most advice came down to set up a new key without a passphrase. Nope.
This section has had a few changes. Don’t get attached to anything you read here. A bunch will change by the end of this post. Leaving the trail here for future reminders though.
I came up with an easier solution, just adding on to my alias.
alias diary="vim ~/vimwiki/diary/diary.wiki && ~/diarycommit"
This opens the diary in vim and when it closes, it runs a script, diarycommit (not actually located at ~). Here’s what that looks like:
#!/bin/sh

cd ~/vimwiki
git add .
git commit -m "$(date)"
git push
This adds, commits - using the current date/time as a commit message - and pushes.
The result: I type diary, write what I want, close vim, it’s backed up.
This isn’t perfect. I might go into my diary and leave it open for while, or start editing some other files in vim. It won’t actually commit and push until I finally close vim.
Also, I might be editing something else in vim and have a thought, use a shortcut to open the current page, and close it and go on doing what I was doing. In this case, because vim wasn’t opened with the alias, my changes won’t get pushed when I do eventually close vim.
But it’s good enough for now. Eventually I’ll open things as described above. Or I can always just run diarycommit manually.
If anyone has any tips on how to use a passphrase from a cron job, let me know.
I’m also thinking of an autocommand that runs the commit script on buffer close.
Update: this works! See updates below.
I had one issue where if I was ever editing some non-wiki markdown file (like this very post I was writing via Hugo), vim was treating it like it was part of vimwiki, adding vimwiki mappings to it and other things that were messing me up. I found the solution here
Vimwiki considers every markdown-file as a wiki file
Vimwiki has a feature called “Temporary Wikis”, that will treat every file with configured file-extension as a wiki. To disable this feature add this to your vimrc:
let g:vimwiki_global_ext = 0Alternative you can set vimwiki to use markdown syntax but a different file-extension, like the default .wiki.
This did the trick.
I figured out something better for git saves. Yet another autocommand!
vim.api.nvim_create_autocmd("BufWritePost", {
  pattern = { "*/vimwiki/diary/**" },
  command = [[ silent! !/path/to/diarycommit ]],
})
This executes right after I write a buffer to a file (save it). Only if it’s in my diary files. It just runs the commit script. Save the file, it gets commited. Works great! I added silent! here so it didn’t give the whole commit message in vim. But you can leave it out too.