Raspberry Pi Pico – What I’ve Learned
So the new Raspberry Pi Pico board came out a few weeks back and there’s all kinds of news about it. For the uninformed, it’s a shift from other RPi boards. Most Pis are single board computers. They run an operating system – usually some Linux-based variant. The Pico is a microprocessor. Basically an Arduino alternative. But a pretty damn powerful one. Two cores, fast, good memory, 26 gpio pins, analogue to digital converter, real time clock, temperature sensor, etc. All for $4. So I grabbed a couple. By the way, if you’re ordering on line, make sure that you buy the header pins. They are not always included by default.
There are a ton of tutorials on line already, most of which are nearly exact clones of each other: solder pins on, plug in it while holding down the bootsel button, drag the micropython uf2 file onto the mounted drive, it will reboot, install Thonny, write a script to make an LED blink. So I’m not going to go through all that. Or you could say I just went through all that in one sentence.
One thing I highly recommend is the “Get Started with MicroPython on Raspberry Pi Pico” book put out by the Pi people themselves. It’s a bit cartoony and starts off really basic. In fact, going all the way through chapter 4 will get you through what most of the tutorials on line cover. But with a lot more depth. There’s several pages on how to solder the pins on. But further chapters get into some pretty good stuff, including various sensors and controls and I2C and SPI control of an LCD panel. Good starter stuff.
Stuff I’ve learned
Ran into lots of snags going through the process of learning this board and figuring out what I even want to do with it. A lot of this has to do with the fact that it’s really in its infancy. I’m sure that things will get better as time goes on, but there are a lot of rough edges right now. And beyond the book, there’s very little searchable info out there. Unfortunately, there are other boards/technologies out there named “pico” so that clouds your results. Throw in “Rapsberry Pi” into the search and you’re mostly going to get other RPi stuff. But even when you craft a good search, mostly what you’re going to find is the multiple cloned tutorials mentioned above. There is also a scattering of C/C++ tutorials and resources for the Pico. They look dauntingly complex so I have not dived into those yet.
Another problem is that the version of MicroPython that was made for the Pico is a fork of the official version. And it’s very definitely a subset. The official MicroPython documentation is fantastic, but huge swaths of it are just inapplicable to the version that works with the Pico.
For example, MicroPython has a machine module. In the official version, machine contains the following classes:
class Pin – control I/O pins
<s>class Signal – control and sense external I/O devices
</s>class ADC – analog to digital conversion
class UART – duplex serial communication bus
class SPI – a Serial Peripheral Interface bus protocol (master side)
class I2C – a two-wire serial protocol
<s>class RTC – real time clock
</s>class Timer – control hardware timers
class WDT – watchdog timer
<s>class SD – secure digital memory card (cc3200 port only)
class SDCard – secure digital memory card</s>
The ones struck through are not available on the Pico right now. Since the Pico does not have an SD card, the biggest miss there is the RTC class – the Pico has a real time clock, but no way to access it directly. That doesn’t seem too bad, but it extends from there. The Pin class is missing almost half of the methods on the Pico version of MicroPython. Other classes are missing methods as well, and there are several standard Python modules that are part of MicroPython that are missing from the Pico’s version.
All that said though, there is enough there to get you started on most common projects, and as I said, I’m sure this will grow and become more expansive in the coming months.
Tips and Tricks
A few random tricks and tips for using Micropython on the Pico:
When you install the MicroPython editor, Thonny, it will ask you if you want to run in regular mode or in Raspberry Pi mode. Naturally, I chose Pi mode. And naturally I was wrong. Although it seems to work fine, you wind up missing a lot from the UI.
Here’s the Pi mode:
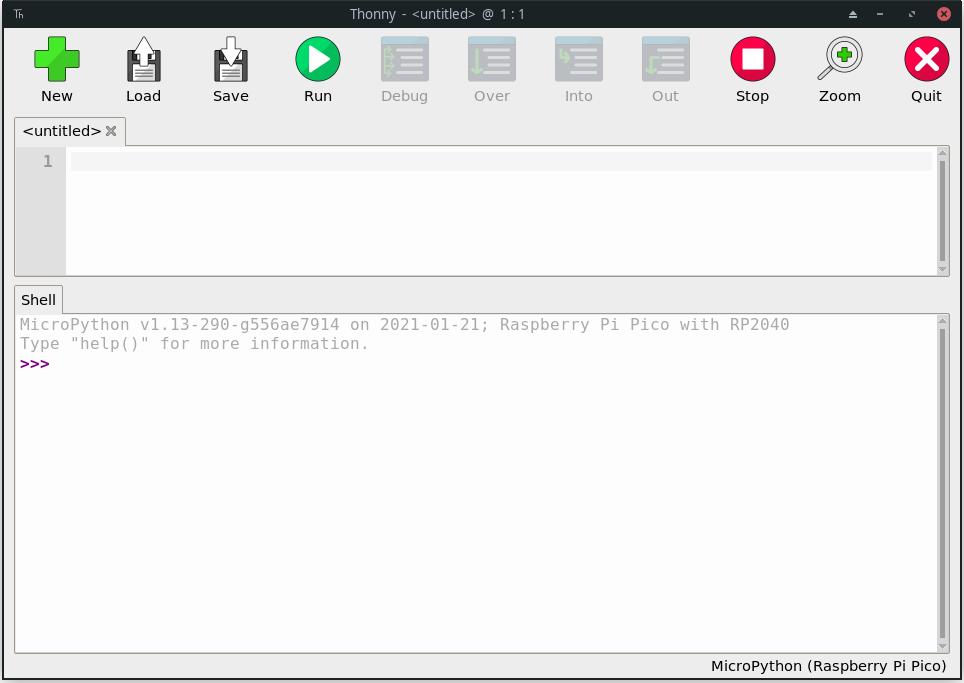
Thonny in RaspberryPi mode, aka “simple”
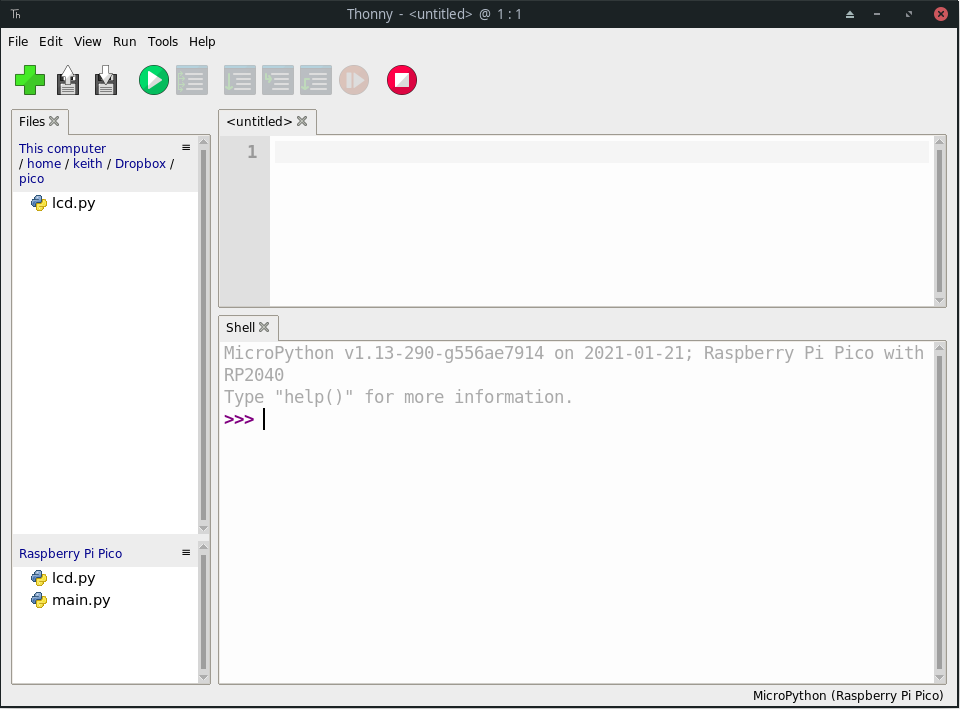
And here it is in regular mode:
I was running in Pi mode for a while and thought it was pretty damn lame. Then I discovered you could go into the options and change it to regular mode. (Also that Pi mode is really called “simple” mode, and there is also an “expert” mode.)
Regular mode gives you full menus, which opens up a massive wealth of features I did not realize even existed. For example, I could find no way to copy files onto the Pico other than opening them up in Thonny and then saving them to the device. But the View menu lets you open a files panel (and a lot more) where you can access files both on your device and your local file system, and “upload” and “download” between the two. Brilliant.
Another gotcha from the book. The book states that by default, gpio input pins are set to be pulldown by default. Pulldown inputs are attached to ground with a resistor and connecting them to positive voltage triggers them. Pullup inputs are connected to a positive voltage with a resistor and connecting them to ground triggers them. If you didn’t pull them one way or the other, stray charges could trigger the inputs. Anyway, the book says that input pins are pulldown and you can create a pin by typing:
pin = machine.Pin(15, machine.Pin.IN)
I did this while testing physical buttons to make an LED turn on. And I was getting all kinds of crazy behavior. If I touched a wire or even just tilted the whole breadboard in a certain direction, the LED was coming on as if I’d pressed the button. I honestly thought that I’d accidentally tapped into some internal accelerometer at one point – I was totally able to control the LED by tilting the board back and forth. After looking up the official MicroPython docs for creating a pin, I found there was a third parameter for controlling pullup/pulldown. So I changed it to:
pin = machine.Pin(15, machine.Pin.IN, machine.Pin.PULL_DOWN)
When I did that – explicitly setting the pin to be pulldown – it was rock solid and worked 100% as expected.
Another question I finally answered for myself is how to have a program run as soon as the Pico boots up. Simple enough – you just name the Python script main.py.
An Alternative Python
There is an alternative to MicroPython though, and that is CircuitPython. As I understand it, CircuitPython is another fork of MicroPython and it is supported on a multitude of microprocessor boards, including the Pico. Because it’s been around a lot longer the the Pico, it is way more expansive in what it supports and has a ton (like 280+) libraries that work with it. CircuitPython is supported by Adafruit, and they’ve also created some really useful libraries, many specifically designed to work with the hardware they sell. So all in all, this is a really great option.
You install CircuitPython the same way you flash the Pico with MicroPython – download a uf2 file, start the Pico while holding down the bootsel button and dragging the uf2 to the mounted drive. It will reboot and be a CircuitPython device now.
One thing to say about CircuitPython is that it is quite different than MicroPython. Although it may be a fork, they forked the hell out of it.
For example, a simple program to blink an LED in MicroPython:
import machine
import utime

led = machine.Pin(25, machine.Pin.OUT, machine.Pin.PULL_DOWN)

while True:
    led.value(1)
    utime.sleep(0.5)
    led.value(0)
    utime.sleep(0.5)
And the same program in CircuitPython:
import board
import digitalio
import time

led = digitalio.DigitalInOut(board.D13)
led.direction = digitalio.Direction.OUTPUT

while True:
    led.value = True
    time.sleep(0.5)
    led.value = False
    time.sleep(0.5)
Not a huge deal, but I think it might be a good idea to choose one and roll with it. You’re not going to be able to run your MicroPython projects on your Pico after you flash it to CircuitPython (and vice versa – though you can simply reflash between the two systems relatively easily).
Personally, I’m torn at the moment. CircuitPython has way more stuff in it and so many existing libraries. But it’s so far different from the standard language, and I’m hoping that the Pi folks will continue to make their implementation more expansive and people will come up with new libraries for it as well.
On the other hand, CircuitPython already has some libraries allowing the Pico to act as an HID device. In other words, you can use it to send keyboard and mouse events to the host computer it’s connected to via USB, good for making custom keyboards or other controllers. And with 26 gpio pins, this winds up being way more useful for complex projects like this than the Arduino Pro Micro clones that I’ve been using. I haven’t found anything in MicroPython to do the same thing, though there is some C++ code out there that seems to support this. I may just end up using both MicroPython and CircuitPython for a while.
More about CircuitPython – the recommended editor is not Thonny, but the Mu Editor. For the most part it seems pretty basic, more like the simple mode of Thonny. No menus or extra panels or anything like the regular mode of Thonny – at least not that I could find. But as an editor, it does have some nice autocompletion and other features that I didn’t see in Thonny.
Something that confused me about Mu: I created a new file and saved it to the Pico and hit the run button, but the other default code.py hello-world type file ran instead. Nothing I could do would make my new file run. It turns out that’s by design. As mentioned, MicroPython devices will auto-run main.py on boot. And CircuitPython will auto-run either code.py or main.py on boot. But Thonny will run whatever active script you have open when you hit run, whereas Mu will always run code.py (or presumably main.py) when you hit run. This can be good or bad. It mimics what will happen when the device boots, but makes it harder to test some other script. The solution recommended is to have code.py or main.py be a simple launcher script that in turn executes some other script. Anyway, good to know.
Another big plus about CircuitPython is that when the device is connected to your computer it also mounts as an external drive. So if you want to add additional libraries to it, you can just drag and drop them to that drive. A bit easier than Thonny’s upload feature.
Summary
So that’s some of what I’ve managed to learn so far. As there is very little data out there at the moment, I hope some of this helps people just getting into this new, fun little board.
Edits/Additions
In the first version of this posts I used the word “robust” several times, indicating that the version of MicroPython for the Pico was not as robust as it hopefully would be in the future and that CircuitPython was more robust. That was the wrong choice of word. Robust in the context of code means that it is able to handle and recover from various unexpected conditions. To say that something is not robust implies that it is unstable. That’s not what I meant to imply.
I changed the word to “expansive”. My intention was to say that the current version of MicroPython on the Pico does not support as many features as it hopefully will and to say that CircuitPython supports more features. Examples are, as I described earlier, the missing RTC class for the real time clock that is in standard MicroPython but not on the Pico. Also, stuff like HID support in the usb_hid library of CircuitPython, but nowhere to be seen in MicroPython (that I can find), as well as all kinds of libraries for working with specific sensors and peripherals that are available for CircuitPython. MicroPython has some of that, but nowhere near what I see in CircuitPython.
Comments? Best way to shout at me is on Mastodon ![]()